What is Azure Site Recovery in Azure?
Azure Site Recovery (ASR) is a DRaaS (Disaster Recovery as a Service) offered by Azure for use in cloud and hybrid cloud architectures. As a disaster recovery platform, it makes it possible for Azure Virtual Machines, Hyper-V, physical on-prem systems, and VMWare to failover to and successfully failback once the disaster has been resolved. A near-constant data replication process makes sure copies are in sync.
But it’s biggest advantage may be its pricing.
The Advantages of ASR
The chief benefit of ASR is its cost-effectiveness.
DRaaS solutions in the cloud vary in price, and ASR is cheaper than its industry rivals. The savings extend beyond ASR’s pricing: by providing access to Azure as a secondary site, the costs of building and maintaining a secondary site can be avoided.
Azure Site Recovery offers a low-cost alternative to traditional hosted or self-provisioned DR environments because the only ongoing costs are for storage required to support the application replicas and the desired retention of recovery points and the per machine per month service fee.
There are no compute, network infrastructure, facility rental, or software licensing fees required during ongoing protection.
ASR also has the advantage of being easy to use when replicating Hyper-V or VMware VMs, and physical Windows and Linux servers. The Azure ASR console provides a unified view on the replication status of all your different workloads and allows you to carry out maintenance tasks, such as tweaking recovery plans.
The console also integrates with other BCDR solutions such as Oracle Data Guard and SQL Always On. ASR is an effective tool for workload migration.
You can use ASR to migrate workloads from on-premises, AWS, or even other Azure regions. This can also provide a flexible replication option for hybrid environments.
For workload and application protection, ASR integrates with several critical workloads, including Active Directory, DNS, Exchange, SAP, SQL Always On, and Oracle Data Guard.
DRaaS is about recovery, and ASR handles recovery very well. High recovery time objective (RTO) and recovery point objective (RPO) thresholds can be costly to an organization, so ASR provides replication frequency as low as 30 seconds (for Hyper-V) and continuous replication for VMWare.
To further prepare your system in case of a failure, ASR can run non-disruptive failover and DR drills. In addition to executing non-planned failovers during production downtime, ASR can carry out test failovers or planned failovers to test DR capabilities and planned outages.
ASR’s customizable recovery plans also allow sequenced failover and recovery of multi-tiered apps like Database and Web Services.
- Planning Stage
There are several factors that govern a DRaaS strategy: RTO and RPO goals, storage (IOPS and storage account), capacity planning, network bandwidth, network reconfiguration, and daily change rate.
Microsoft-provided tools Azure Site Recovery Capacity Planner and Azure Site Recovery Deployment Planner can help you analyze your source environment and compute requirements for the target environment.
One aspect of Azure ASR to keep in mind at this point is network planning. You have to determine if you want to use a stretched subnet across both sites or if you will use a subnet failover. You will also need determine the failover IP ranges.
Make sure to review the support Matrix to understand the prerequisites for replicating using ASR. It is also prudent to verify the kinds of workloads that can be migrated using ASR.
You can find the full list here.
Pro tip: Lookout for limitations like a 4TB limit for individual disks on each protected VM. If workloads are being migrated from AWS, be aware that it is a one-way migration to Azure and the replication cannot be enabled back to AWS.
Also, lookout for additional charges for storage account usage, storage transactions, and outbound data transfers when configuring ASR.
- Prepare and Configure
Now that we have a solid plan based on source environment analysis and capacity planning, we can start preparing our environments for replication. The first step is to prepare the source.
ASR supports several source environments like VMware (with or without vCenter), Hyper-V VMs (with or without SCVMM), AWS workloads, physical servers, and Azure VMs. It is important to note that there are different requirements based on the source environment.
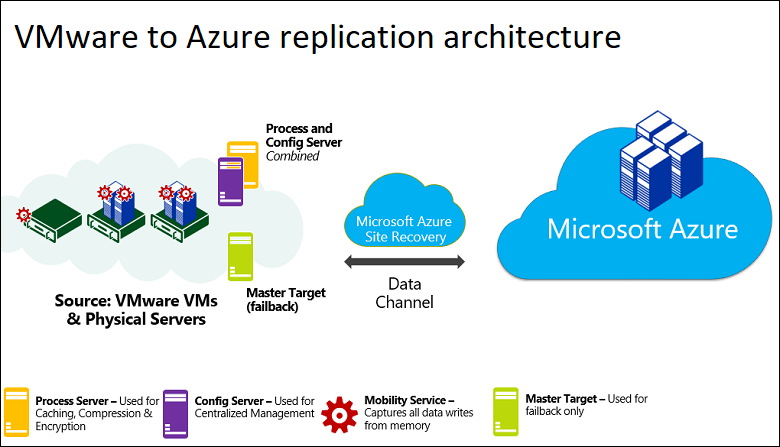
For example, VMware VMs would require additional resources such as a configuration server, process server, and mobility services to help manage, coordinate, and send the encrypted and compressed data chunks to the Recovery Services destination.
The next step is to prepare the destination environment. The destination or target for ASR replications can be a Hyper-V host, VMware Site, or Azure. No matter which one you choose, the very first thing to do would be to create a Recovery Services Vault in Azure (either through Resource Manager or Classic portal).
The Recovery Services Vault will house the replication settings and manage the replication.
If your target is Azure, you need to create storage and network accounts which will house the replicated on-premises machines (note: for the storage accounts you’ll have to decide between standard and premium account types, and set the LRS and GRS replication options based on your RPO).
If you are replicating to a secondary site, you will need to prepare the hosts on the secondary site by installing the configuration components: Azure Site Recovery Provider for all SCVMM servers (in case of Hyper-V hosts) and InMage Scout components for VMWare machines or physical hosts.
Lastly, it is time to configure and enable replication. After the source and target have been prepped, you need to create a replication plan that aligns with your RTO and RPO objectives. Now select the Virtual Machines to be replicated and select the Replication policy that you defined earlier.
Finally, enable the initial replica (note: this process can take quite some time). After the initial replication is complete, ASR replicates data in incremental chunks (changed data) at an interval defined by your replication policy.
- Failover and Failback
Now that you have performed the replication, it is time to validate the setup and determine if and what changes you need to make if you have to execute a failover. There are two ways to try this: a test failover or an actual planned or unplanned failover.
A test failover has no impact to production, but a planned or unplanned failover involves shifting the production site to the replication site such as Azure or another host.
A test Failover can be done either through a recovery plan (to orchestrate failover of multiple machines) or manually for each VM through the Azure console.
If you executed a planned failover, don’t forget to reprotect the machines after they have failed over. Once your source site is up, you can failback the VMs using the process server, master target server, and a failback policy.
Note: In Windows VMs, don’t forget to set the SAN policy to Online All if you want to retain the drive letters after failover.
- Manage, Monitor, and Troubleshoot
It is advisable to keep monitoring your replication settings to ensure that your RPO objectives stay aligned. You can tweak replication settings or add scaled out process servers to meet these objectives.
Apart from providing job alerts on the Azure console, ASR also has its own Event Log Source that can be useful for troubleshooting replication failures. Here is a guide on what event sources and ports need to be looked at while troubleshooting these failures.
- ASR Migration Capabilities
In addition to being an excellent BCDR tool, ASR’s migration capabilities deserve a special mention. Not only can you migrate on-premises workloads with ASR, you can also migrate cloud workloads such as AWS VMs and Azure VMs from other regions.
The initial setup for performing such migrations is very similar to replicating physical machines to Azure.
In ASR migration, instead of executing a failover you would migrate by right clicking the VM on the Azure portal and executing “Complete Migration.” This will completely migrate the workload, stop replication, and stop ASR billing for the machine.
You can find more details on that here.